If you've ever wanted your own carvings, it's possible to follow along with a photo-trail. It can be a great way to emulate a famous carving without spending hours researching different styles. This will allow you to have as much fun as possible while achieving realistic results. Do not worry if your skills aren't up to par. There are many easy ways to achieve realistic-looking eyes!
Lesson 4: Carving hair
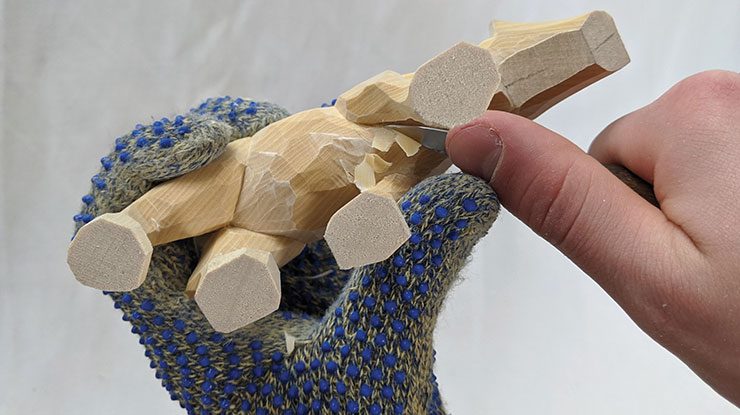
This step-by-step tutorial will show how to carve flowing hair onto the eyes for your animal carving. It will help create a realistic appearance that evokes lifelike emotions. It will also demonstrate the different tools you can use to make the different textures of hair. Learn how to use different curved instruments to create different levels. Once you are familiar with the basics, the next step is to learn how to work on the more complex areas of the face such as the eyeballs.
With a pencil, draw the eye cavities. Next, draw an extended straight line from your eyebrows and eyelids. You can also draw small squiggles on the forehead to make it rounder. You can then use a whittling razor to smoothen the corners of the cheeks.
Lesson 5 - Carving crow's feet
Crow's feet is a common condition. You should learn what causes it. Repeated facial expressions (such as squinting) can lead to these wrinkles. Therefore, if you are prone to crow's feet, you should use reading glasses or invest in a pair of sunglasses. For crow’s feet prevention, you can use facial moisturizers.
Fine lines and wrinkles on the face make people appear older than their years. These lines can be easily removed to reveal a more youthful-looking complexion. Here are some helpful tips:
Lesson 6 Carving an Iris
Children can see the iris, ocellus and other parts of their bodies in a mirror. This will help them to understand how they feel and look. They can also draw their own eyes using observational drawing and the mirror. They can also look for white and different shades in the central black. After they have finished the drawing, they can add colour using different media and try to create the illusion of depth. Children can then compare the colours in their eyes by looking at one another's drawings.
FAQ
How do I get started with woodworking?
Building furniture is the best way to learn how furniture is made. While you will need tools, mistakes are inevitable, but you will learn the ropes if you persevere.
Begin by choosing the project that you want to finish. It can be as simple as a small box, or as complex as a complete entertainment center. Once you have chosen a project, locate a local woodworker who is skilled in this kind of work. Ask him or her for advice on what tools you'll need and where to find them. You might even ask whether there's someone else you can talk to who does this kind of work.
What tools should I start with when becoming a woodworker?
Woodworking requires patience and practice. It takes time for you to master the different techniques and tools that are required to woodwork.
There are many options for woodworking equipment today. Some prefer to use power tools and others prefer hand tools.
While you have the option to pick what you like, it is essential that you get the right tool for the job. It may be a good idea to start with a basic set, if possible, if you don’t know much about hand tools.
You might also want to learn how a router works, which allows you to cut wood into intricate shapes. These routers can be purchased at most hardware and home improvement stores.
Are you able to teach yourself woodworking
It is best to do it yourself. Woodworking is an art that takes patience, practice, skill and experience. It takes time to master any craft.
The best way to learn how to do something is actually to do it. Start small and learn from your mistakes.
How long does a piece take to finish?
It depends on the type of wood you choose, the complexity of the design, and the amount of finishing you apply. Hardwoods, on the other hand, are more durable than softwoods. Hardwoods are more expensive than other woods. They last longer and are more resistant to moisture. The process of finishing a piece of furniture typically takes anywhere from one week to three months.
Statistics
- In 2014, there were just over 237,000 jobs for all woodworkers, with other wood product manufacturing employing 23 percent; wood kitchen cabinets and countertop manufacturing employing 21 percent. (theartcareerproject.com)
- Average lumber prices rose about 600 percent between April 2020 and May 2021. (familyhandyman.com)
- Woodworkers on the lower end of that spectrum, the bottom 10% to be exact, make roughly $24,000 a year, while the top 10% makes $108,000. (zippia.com)
- If your lumber isn't as dry as you would like when you purchase it (over 22% in Glen Huey's opinion…probably over 10-15% in my opinion), then it's a good idea to let it acclimate to your workshop for a couple of weeks. (woodandshop.com)
External Links
How To
How to make wooden joints
This tutorial will show how to join 2 pieces of wood together. We will be using the "pocket-hole joint", which involves drilling holes in wood and then gluing them together. This works well if the wood is straight and smooth. If your wood isn't straight or flat, you might want to try another method, such as dowel joinery. These are the steps
-
Drill Pocket Hole Joints. You will need to measure and mark the exact location of your pocket hole joint. You will then drill 3/4" deep holes through each piece of wood with a jigsaw, handheld drilling machine, or hand-held drill.
-
Sand Smooth. You can sand the edges of the wood to ensure that it doesn't split.
-
Glue Together Apply glue to both ends of the wood. Allow it to sit for approximately 5 minutes before you clamp the pieces together.
-
Secure the pieces together. After the glue has dried completely, you can clamp the pieces together until they are flush.
-
Trim Joinery. Trim the excess wood around the joint after the glue has dried completely.
Make sure to leave enough room between the pieces so that you can turn them inside and out.